Startup Tasks in Azure Virtual Machine (VM ) Role
Since the release of Windows Azure SDK 1.3 we can now have startup tasks defined in the ServiceDefinition file for web/worker roles. However, this is not allowed for a Virtual Machine role. So what to do in case you need to have some tasks/scripts to be run on your VM Role’s startup? For example, your VM Role runs some software applications that require some configuration information that can be available only at run time.
So, how will you have startup tasks in a Virtual Machine Role? If you think that it’s just an easy task that involves adding you tasks in the Windows Startup folder (C:\ProgramData\Microsoft\Windows\Start Menu\Programs\Startup), then you are mistaken. This is not going to work as the tasks in the startup folders are executed only when a user logs in to the machine, but this is not what you want. Your tasks should run whenever your role is started.
The solution for this is to use VM Role Adapter. This basically involves creating a Windows Service that is configured to Start Automatically when windows start. This is really simple and involves following steps:
1. Create a WindowsService project in Visual Studio, let’s call it VMRoleStartup and write the operation you want to be executed at VM Role’s startup in the OnStart() method.
2. Add the installer class to the service by opening service’s class in designer mode and right-clicking. Select “Add Installer” from the menu as shown below. This class is used to install the service.
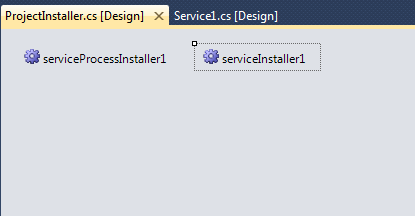
3. This will create a new class ProjectInstaller.cs with serviceInstaller and serviceProcessInstaller.
4. Go the properties of serviceProcessInstaller and select Account as LocalSystem. This is required so that the service will run as an administrator account.
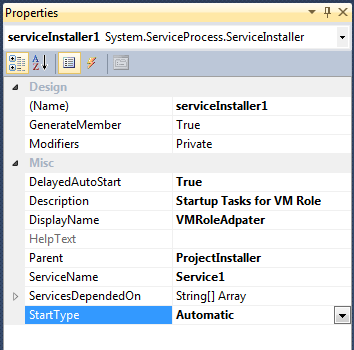
5. Go to the properties of the serviceInstaller class and make following changes:
• Make sure that the Service name is same as that of your Service name
• Add Description and DisplayName as you want to be displayed in Services Management Console.
• You can set DelayedAutoStart to True, to make sure that your VM role comes into a stable state before your tasks are started.
• Set StartType to Automatic.
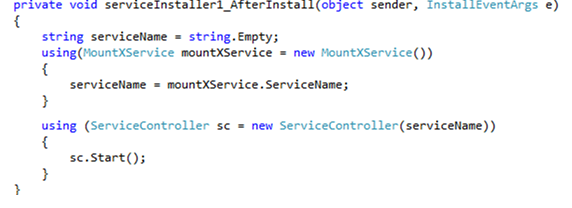
6. In the ProjectInstaller.cs class add the following code to start the service after it is installed.
Please note that MountXService here refers to your service class name.
7. Build the application under Any CPU or x64 platform (because VM Role runs under x64 platform).
8. Copy the .exe file (along with dlls if required) to VM Role and install it using installutil by running it from command prompt as an administrator user.
“installutil” is available in “C:\Windows\Microsoft.Net\Framework64\v4.0.30319” path.
9. Upload your image to Azure and create a service model for VM Role to connect to this image.
This is it, now you are done and when your VM Role starts your windows service will be started and will execute the code you put up in it's OnStart method.
So, how will you have startup tasks in a Virtual Machine Role? If you think that it’s just an easy task that involves adding you tasks in the Windows Startup folder (C:\ProgramData\Microsoft\Windows\Start Menu\Programs\Startup), then you are mistaken. This is not going to work as the tasks in the startup folders are executed only when a user logs in to the machine, but this is not what you want. Your tasks should run whenever your role is started.
The solution for this is to use VM Role Adapter. This basically involves creating a Windows Service that is configured to Start Automatically when windows start. This is really simple and involves following steps:
1. Create a WindowsService project in Visual Studio, let’s call it VMRoleStartup and write the operation you want to be executed at VM Role’s startup in the OnStart() method.
2. Add the installer class to the service by opening service’s class in designer mode and right-clicking. Select “Add Installer” from the menu as shown below. This class is used to install the service.
 |
| Add Project installer to Windows Service |
3. This will create a new class ProjectInstaller.cs with serviceInstaller and serviceProcessInstaller.
 |
| Project Installer Class |
4. Go the properties of serviceProcessInstaller and select Account as LocalSystem. This is required so that the service will run as an administrator account.
 |
| Service Process Installer Properties |
5. Go to the properties of the serviceInstaller class and make following changes:
• Make sure that the Service name is same as that of your Service name
• Add Description and DisplayName as you want to be displayed in Services Management Console.
• You can set DelayedAutoStart to True, to make sure that your VM role comes into a stable state before your tasks are started.
• Set StartType to Automatic.
 |
| Service Installer Properties |
6. In the ProjectInstaller.cs class add the following code to start the service after it is installed.
 |
| Code to start windows service after installation |
Please note that MountXService here refers to your service class name.
7. Build the application under Any CPU or x64 platform (because VM Role runs under x64 platform).
8. Copy the .exe file (along with dlls if required) to VM Role and install it using installutil by running it from command prompt as an administrator user.
“installutil” is available in “C:\Windows\Microsoft.Net\Framework64\v4.0.30319” path.
 |
| Install windows service using installutil |
9. Upload your image to Azure and create a service model for VM Role to connect to this image.
This is it, now you are done and when your VM Role starts your windows service will be started and will execute the code you put up in it's OnStart method.


Hello All:
ReplyDeleteI tried to create the windows service, I am unable to find MountXService class. Can anyone help me out in fixing this?
Thanks in Advance,
Mahesh
Well replace that with the name of the class that you use to create your service
ReplyDeleteI created the class but the RoleEnvironment is not avaliable on the windows service call
ReplyDelete